
Few motorcycle maintenance jobs look simpler than adjusting chain tension — and yet it remains one of the most commonly misunderstood tasks among riders worldwide. Too tight, and you risk premature sprocket wear, gearbox stress, or even snapped chains. Too loose, and acceleration becomes jerky while handling stability suffers. The problem isn’t effort; it’s misinformation. Here is how to master the 10-minute job that most riders get wrong.
Chain Tension & Alignment: The 10-Minute Job Most Get Wrong.
Chain Tension & Alignment: The 10-Minute Job Most Get Wrong.
In reality, chain maintenance is the most underestimated factor in how a motorcycle actually feels to ride. A poorly adjusted chain doesn’t just wear out your sprockets; it makes your throttle response jerky, creates a phantom vibration through the footpegs, and—in extreme cases—can snap and punch a hole through your engine case. Many riders adjust slack while the bike sits unloaded on a paddock stand, ignoring how suspension compression dramatically changes chain tension once a rider, luggage, or passenger is added. Others rely solely on swingarm markings that may not perfectly align the rear wheel.
In this guide, we explain the common mistakes riders make, how to measure slack correctly, and why precision matters far more than speed when adjusting your motorcycle chain.
The Slack Trap: Loaded vs. Unladen
The most debated topic in the paddock is whether to measure chain slack while the bike is on a stand, on its side stand, or with the rider sitting on it.
The Physics of the Swingarm
As your rear suspension compresses, the distance between the front sprocket (the drive) and the rear axle increases. The chain is at its tightest point when the front sprocket, the swingarm pivot, and the rear axle are in a perfectly straight line.
Finding the “Tight Spot”
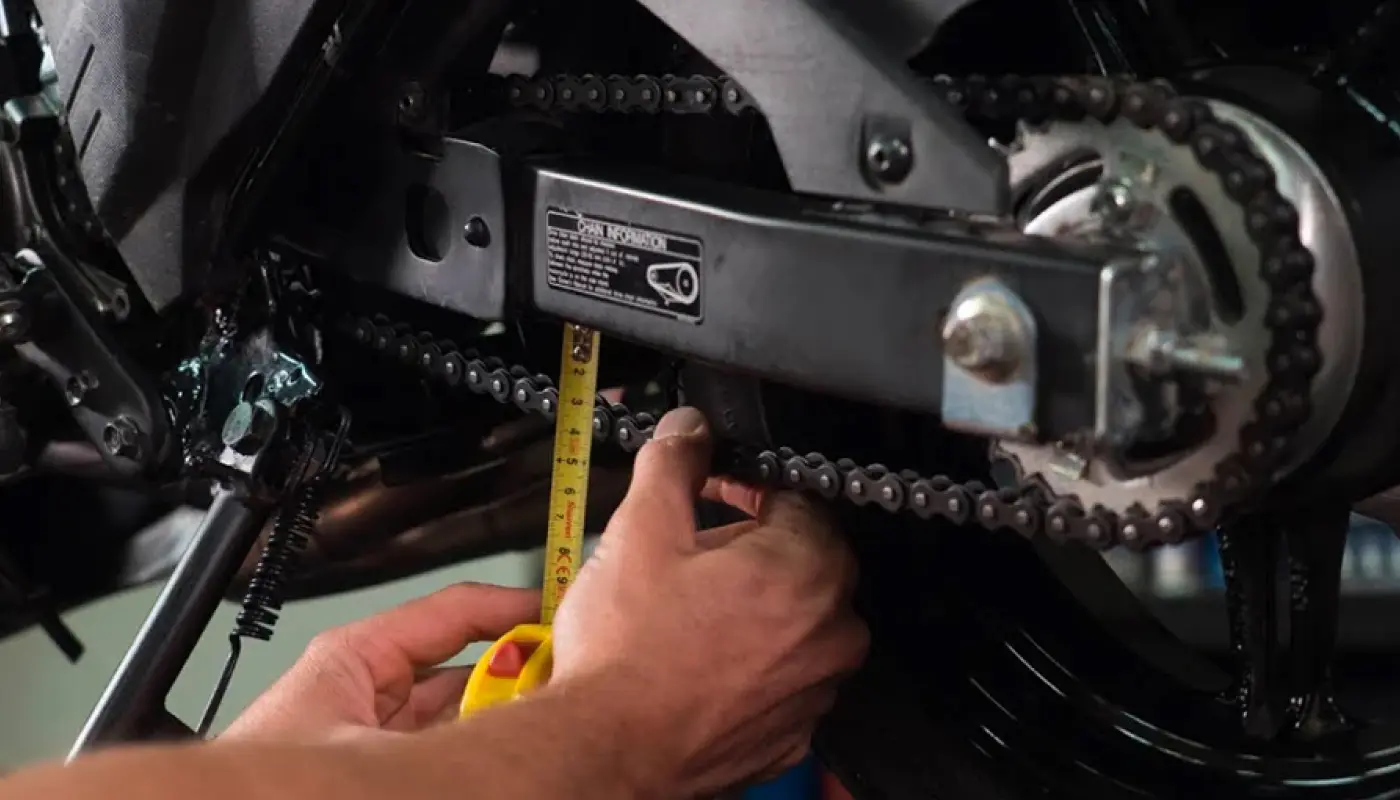
Chains do not wear evenly. Because of how the metal links stretch and the rollers wear against the teeth, every chain has a “tight spot” and a “loose spot.”
Never adjust your chain without rotating the wheel first
- 1. Put the bike in neutral on a stand.
- 2. Slowly rotate the rear wheel by hand.
- 3. As you rotate, push up on the bottom run of the chain.
- 4. You will find a section where the chain feels notably more rigid. This is where you measure and adjust. If you adjust the slack at the loose spot, the tight spot will become dangerously over-tensioned once you hit a bump.
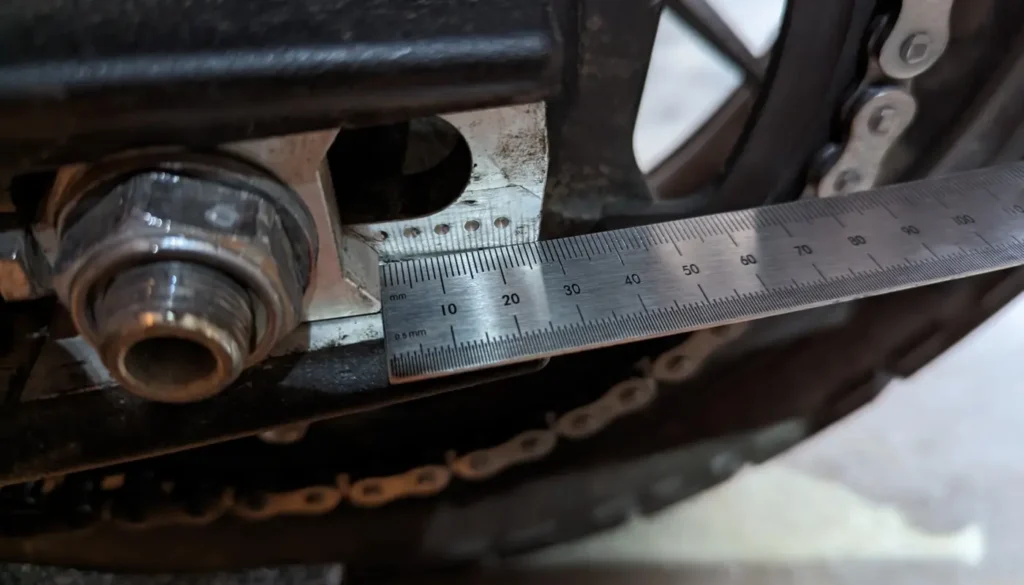
Alignment: Why Your Swingarm Marks Are Lying
Most bikes have small “hash marks” etched into the swingarm to help you line up the axle. In the factory, these are “close enough.” But after years of road grime, chain adjustments, and the occasional tip-over, these marks can become notoriously inaccurate.
If your rear wheel is even 1° out of alignment, the chain won’t meet the sprocket teeth perfectly centered. It will “climb” the side of the teeth, creating friction, heat, and a rhythmic clack-clack-clack sound.
The Laser Alignment Tip
In 2026, the gold standard for the home mechanic is the Laser Alignment Tool (like those from Profi or Motion Pro).
Quick Comparison: Alignment Methods
| Method | Accuracy | Cost | Effort |
|---|---|---|---|
| Swingarm Marks | Low (Can be 2–3mm off) | Free | 1 Min |
| String Method | High (If done perfectly) | $2 | 15 Mins |
| Laser Alignment | Highest (Sub-millimeter) | $60–$100 | 2 Mins |
| Rod Alignment | Medium-High | $20 | 2 Mins |
The 10-Minute Step-by-Step
- 1. Clean it first: You can’t accurately measure a chain caked in 500 miles of road salt and old lube.
- 2. Find the tight spot: Rotate the wheel.
- 3. Loosen the axle nut: Just enough to allow the adjusters to move the wheel.
- 4. Adjust in “Flats”: When turning your adjuster bolts, count the “flats” of the nut (e.g., “two flats on the left, two flats on the right”). This keeps you in the ballpark before you fine-tune.
- 5. The “Rag Trick”: Before you tighten the axle nut, place a rag between the chain and the rear sprocket and roll the wheel backward so the rag gets caught. This pulls the axle tight against the adjuster bolts, ensuring your alignment doesn’t slip as you torque the nut down.
- 6. Torque to Spec: Use a torque wrench. A loose axle is a nightmare; an over-tightened axle can crush your wheel spacers.
Chain Tension & Alignment: People Also Ask
1. Should chain slack be measured loaded or unloaded?
Most manufacturers specify slack measurements with the motorcycle unladen on its side stand. However, checking tension under rider weight ensures the chain never becomes overly tight during suspension compression.
2. What happens if a motorcycle chain is too tight?
Excess tension can damage wheel bearings, countershaft seals, suspension movement, and sprockets. It may also increase vibration and drivetrain wear.
3. Are swingarm alignment marks accurate?
They provide a general reference but are not always perfectly precise. Measuring axle distance or using alignment tools offers better accuracy.
4. Are laser chain alignment tools worth it?
Yes, especially for riders who frequently maintain their own motorcycles. Laser tools provide quick visual confirmation that sprockets are perfectly aligned.
5. How often should chain tension be checked?
Every 500–700 miles (800–1,100 km) or after heavy riding, rain exposure, or long touring days.
Final Thoughts
Chain adjustment may be the quickest maintenance job on a motorcycle — but it’s also one of the easiest ways to cause expensive damage when done incorrectly. Understanding how suspension geometry affects tension, double-checking alignment beyond swingarm markings, and using simple modern tools like laser guides transforms guesswork into precision. Spend an extra five minutes measuring correctly, and your chain, sprockets, and gearbox will thank you for thousands of miles.
Precision beats speed. A properly adjusted chain improves safety, ride quality, and drivetrain longevity more than almost any other basic maintenance task.